
Category: Uncategorized

  • Prep Your Kids for Summer

    Summer is fast approaching and now is the time to shop for all the items you need while the store shelves are full and the selections plentiful.  It is hard to think about bathing suits and shorts right after putting our winter coats away, but advanced planning will save you from the stress of running around trying to find necessary items the week before summer camp starts or the day before you leave for your summer vacation. Prepping your kids for summer now will also save you money.

    Flash back photo of my kids from 2010
    Flash back photo of my kids from 2010

    Here is the list of items that you must check in your supply:

    • Bathing suits: 2-3 per child except if they are doing summer camp. In this case, you want to have at least 6 (2 per day from Mon-Wed, laundry on Wednesday to get you through the rest of the week).
    • Beach/pool towels: I recommend buying one nice towel per person and then if your kids go to camp, buying cheap towels that you won’t stress about if they get destroyed or lost. You can buy a 6 pack of hotel towels at Sam’s Club or Costco for around $25. Also, Five Below and Target often have towels for $3-$5 per towel. Personally, I have towels in two colors (one for each child), so I know who loses what.
    • Goggles
    • Water shoes/flip-flops
    • Sunscreen
    • Bug spray
    • Life-vest (for younger non-swimmers or boaters)

    If your kids go to camp, you will need to label all of their clothing. I recommend Lovable Labels . They are self-adhesive and last all summer through washing and drying, so they are worth the money. To save a few bucks, you can get the mini-dots.

    I recommend that you let them use an old backpack for summer camp. They sit all day with wet bathing suits and towels and often get muddy and gross by the end of summer (even if you wash it regularly). Regular washing and rough handling by your kids will break down the material and most of ours end up with holes by the end of summer. Save your money for a new backpack for school in the fall.

    If you are one of those people that throws away 15 tubes of half used sunscreen every year because it expires, then maybe it’s time to plan a little better. Sunscreen is expensive and if you are throwing away 15 half used tubes, then you are also throwing away money. With the cost of sunscreen between $6-15 per tube, you could be throwing away $50-100 worth of sunscreen each year. Or, if you are using expired sunscreen, it could result in sunburns that could ruin your day, your vacation and harm your or your child’s health.

    How many tubes of sunscreen do you need? This will vary depending on how much your family is outdoors during the summer, where you vacation and if your kids go to summer camp, but here is my calculation to give you an idea of what you will need. AND, most places have sunscreen 20% off right now, so take advantage and stock up, but don’t overstock!

    • 1 bottle or tube per child for camp (labeled and in their daily camp bag
    • 1 for the car (just in case you didn’t put it on before you leave the house or need to reapply)
    • 1 face + 1 body in the kitchen to put on in the morning (I use separate ones for body 30 SPF and face 50 SPF)
    • 1 face + 1 body in the pool bag
    • 1 face + 1 body per week, if you are going to somewhere sunny for vacation

    Advance planning will give you more time and money to enjoy all the fun summer brings with it.

    If you want to read more about prepping your kids for summer day camp, please read our blog post on Summer Camp Organizing.

    If you liked today’s post, you’re welcome to use it in your own newsletter or blog as long as you include the following blurb: Tara Rudo, Life Strategist, helps working moms and families focus on what is important. Get our FREE weekly tips and advice at www.NoMorePiles.com.

  • Get ready for outdoor activities!

    Spring is finally here and it is time to take out the ice scrapers and snow gear of your car and repack it to the rainy and warmer season. Whether you are the outdoors person or you will spend hours shuttling kids to various outdoor activities, you need to stock your car for spring.
    We recommend that you get a large tote to keep everything inside.  There are two that we recommend.  One, is the Smartworks Pop-Up Organizer  ($25 on Amazon) and the other is Thirty One large Utility Tote ($35 on Thirty One.com.)

    • This will avoid having your things spilled all over the car
    • Easy to move to another car or take it out of you need the extra space
    • Easy to bring inside and restock it after a busy week

    Here is our must have list:
    • First aid kit: bandaids, single use ice packs, antiseptic wash, allergy relief medicine (aka Benadryl. Also good to have on hand for bee stings), pain reliever, athletic tape
    • Sunscreen & bug spray
    • Water
    • Emergency snacks: power bars (regular Lara bars are good since they don’t melt), peanut butter crackers, fruit crushers and other non-melting items
    • Wipes and tissues
    • Trash bags: multifunctional item!!! Put the muddy, wet clothes in it; use it for sitting on if the ground is wet; or even wear it as a poncho if it rains.
    • Hair ties for those with longer hair

    car organizer unpacked

    If you have young kids or babies, you may want to add extra diapers and change of clothes. You should also keep these other items in your car or handy in the garage to use them on sports days:
    • Folding chair
    • Blanket
    • Hats and/or sunglasses

    Being ready helps you to enjoy more of the springtime weather and be prepared for unexpected events. When you are dealing with kids, it is NEVER a bad idea to be prepared for the inevitable, unexpected events.

    Car organizer packed

    If you liked today’s post, you’re welcome to use it in your own newsletter or blog as long as you include the following blurb: Tara Rudo, Life Strategist, helps working moms and families focus on what is important. Get our FREE weekly tips and advice at www.NoMorePiles.com.
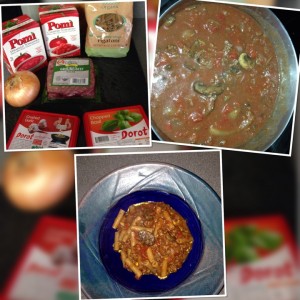
  • Quick and Easy Pasta & Meat Sauce

    Here is my favorite recipe for a quick and easy pasta and meat sauce.  I always get lots of compliments on my pasta sauce, so I am sharing it with you.  Now that the weather is turning colder, it is always nice to be able to have a hot meal on the table quickly.  I also seem to have at least 4 or 5 occasions over the fall and winter when I have unexpected dinner guests.  This is a great way to have a nice dinner on the table for my guests that seems to please a crowd.  Plain pasta can be served for toddlers or picky eaters.  Or, you can serve a large bowl family style for a casual meal. Pair with a quick salad and some good bread and you are set!

    Here is my quick and easy pasta & meat sauce.  There are 3 amazing things about this sauce:

    1. It tastes like you cooked it for hours and you only need 30 minutes!

    2. You can add lots of things to this sauce or take some things out to suit your and your family’s tastes.  Remove the onions and mushrooms, if your family doesn’t like veggies in their sauce.  Or, for more options, add italian sausage, chopped peppers, zucchini, fresh tomatoes, black olives, capers, crushed red pepper flakes.

    3. It is a super thing to have in your freezer, so just double your recipe and pop your leftovers in a container and you can have a meal another time.
    Meat-Sauce-300x300

    The ingredients are:

    1 pound ground beef (or any other meat you like: turkey, chicken, sausage.  I often use bison to make it leaner but still meaty in flavor)

    1 onion, diced

    1 container/can strained or pureed tomatoes (26 oz) (I like Pomi brand)

    1 container chopped tomatoes

    1 package sliced mushrooms

    1/2 cup red wine

    3 cubes garlic (I like the Dorot herb cubes, but you could just chop 3 cloves)

    4 cubes basil

    2 tablespoons olive oil

    salt & pepper

    1 pound pasta, your choice of shape (I like Bionaturae brand organic pastas)

    In a medium pot, add the olive oil and brown the ground beef.  If you chose a lean cut, you can just add the onions, mushrooms and meat at the same time.  If you chose a fattier cut, brown the ground beef and drain it before adding it back into the pot with the vegetables.  No need to cook the meat all the way through at this point.

    Boil a large pot of water and cook pasta according to instructions.

    Add the red wine to meat and veg mixture and simmer for 1 minute.  Then add the garlic, basil, tomatoes and simmer for 20 minutes on medium low.  Season with salt and pepper, to taste.

    You can serve the pasta and sauce separately OR reduce the pasta cooking time by 2 minutes and while still slightly undercooked, strain and add the pasta to the sauce pot and cook for the last two minutes in the sauce and serve family style in a large bowl.  Enjoy!

    If you liked today’s post, you’re welcome to use it in your own newsletter or blog as long as you include the following blurb: Life Management Expert, Tara Donohue Rudo, helps working moms and families focus on what is important. Get her FREE weekly tips and advice at www.NoMorePiles.com.

  • Our Favorite Shelving Unit

    As organizers, we have lots of favorite products.  This is, hands down, our favorite shelving unit and has been for the past 10 years (since I first discovered it).  It is the Seville Commercial Industrial Storage Shelving.  We have put together about 50 of these shelving units so far this year, so we are pros (check out our video to learn our tricks).  This blog post is to show you why we love them and the best way to put them together.  We have even filmed a short video to help you put them together in the fastest, most efficient way.

    We typically buy them at Sam’s Club, but they are also available online at Seville Classics.  Before you rush out to Sam’s Club to buy them, bring a friend.  The boxes weigh 80 lbs, so this is not something you want to lift alone.  Also, you always want to measure your area and figure out what you plan to put on the shelves BEFORE you buy them.  Our rule is to NEVER containerize before we have sorted and purged.

    These are our favorite shelving units for several reasons:

    1. They are sturdy and hold a lot of weight (200 lbs per shelf).

    2. They are on wheels so they are mobile.  You can put them in front of water heaters, electrical panels, heat pumps, etc in a basement and move them to to change filters or service them.  This gives you valuable shelving in spaces where you couldn’t put permanent shelving.  It also makes it easy to move them to clean under or around them.

    3. They are adjustable.  You can put the shelves at any height that works for what you plan to store on them.  Don’t need six shelves or have taller bins going on the shelves, then just use five.  Many times when we buy multiple shelving units for clients, we will have one unit with 5 shelves and another with 7.  They are easily customizable for your needs.

    4. They are up off the floor.  So, if you use them in a basement or garage where water could be an issue, they aren’t sitting in the water and will better protect what is on the shelves.

    5. You can take them with you if you move to a different house.  Shelving in basement and garages rarely add value to your home, so having shelving you can take with you, saves you money since you only have to buy it once.

    6. They won’t break like the plastic shelving you can find in many stores AND they aren’t damaged by moisture and therefore won’t warp or rust like the traditional gorilla racks.

    7. They come with a pack of shelf liners, so by lining the shelves you can use them for an overflow pantry or for smaller items that may wobble on the shelf.


    We have put together hundreds of these and have a few tricks and tips for helping you get it done right the first time.  Now is the perfect time to watch our video so you can prep before you start.  Now, you are ready to open the box.  As with any assembly project, you will want to unpack the box and make sure that everything you need is in the box.  It is extremely rare that we are missing pieces, but it is always better to know before you start.  In our video, I talked about the lines on the poles and the clips for the shelves.  Below is an up close picture of them so you can see exactly what we are talking about.

    We hope you love your new organized area since you have now maximized your storage!  Happy Organizing!

    If you liked today’s post, you’re welcome to use it in your own newsletter or blog as long as you include the following blurb: Certified Professional Organizer, Certified Organizer Coach and Life Management Expert, Tara Donohue Rudo, helps working moms and families focus on what is important. Get her FREE weekly tips and advice at www.NoMorePiles.com.


  • How to Pack Like an Organizer: 3 days, 3 people, 1 bag

    Are you ready to pack like an organizer?  I am going to show you how to pack for 3 days for one adult and 2 kids in ONE carry on bag (and a backpack for keeping busy on the plane).  I don’t know about you, but my husband always packs his bag the night before we leave or the morning of, in about 20 minutes.  That works because I am in charge of everything and everyone else: myself, the kids, clothes, identification, tickets, sunscreen, snacks, electronics, cords, etc.  There are two keys to packing like an organizer:

    1. Don’t over pack. You don’t need four extra changes of clothes for a 3 day trip.

    2. Have the right tools so you can stay organized once you get to your destination.  My new favorite tool for this is the Ebags Packing Cubes.  I bought each of us the 3 piece multi-pack.  We each have a different color so it is easy to tell whose clothes are whose AND since they are in nice zipper packs, you can set the zippered packs inside a drawer or on a chair/table (depending on the set up where you are staying)

    Ebags Packing Cubes


    For each child, I packed: 1 pair jeans, 3 shorts, 3 tshirts, 4 underwear, 4 socks, 1 pajamas, 1 bathing suit, 1 sweatshirt, 1 pair keens.  For myself, 3 tshirts, 2 shorts, 1 jeans, 1 long sleeved shirt, 1 sweatshirt, 1 pajamas, 1 bra, 4 underwear, workout clothes, sneakers, toiletries and makeup.  Of course, we will have the clothes on our backs as well, so everyone has at least one extra outfit.

    Each outfit for the day is rolled with shirt, shorts, underwear and socks.  This minimizes packing space and also reduces choices for getting dressed in the morning.

    Roll Your Outfits


    When it comes to toiletries, I want to be prepared and yet carry the smallest amount of any given item.  If you are staying in a hotel that provides shampoo, soap, etc., you can carry less (that is not the case for me this weekend).   Since all the liquids need to be separate for the TSA and all fit in a quart sized bag, you need to be strategic.  I have the medium sized LL Bean toiletry bag which I pack with the toothbrushes, brush, hair ties, mini first aid kit (I add extra flex bandaids), tweezers, nail clippers, razor, ear plugs, bathroom wipes, deodorant, contacts and emergency medicines.  In the quart sized bag is saline solution, sunscreen, body lotion, shampoo, conditioner, body wash, hair gel, toothpaste, benadryl cream and my Arbonne RE9 sample pack (I never leave home without my Arbonne skin care and their sample pack is smaller than travel sizes.  If you want to get yours click here).  For makeup, I go minimal: tinted moisturizer, powder, eye liner, one eye shadow, mascara.

    toiletries


    Here is the finished product.  I used the medium packing cubes for our main clothes and the two small packing cubes for my workout clothes and sweatshirt and the kids shoes.

    Packed carry on


    Now, for the backpack.  First, my mini backpack.  I love my Dakine Cosmo mini backpack, it is perfect for days where you are doing a lot of walking with kids and need some stuff and a purse is too uncomfortable for all day (think amusement parks, fairs, hiking, etc).  It has a main compartment and a front organizer compartment with small zippered sections.  I ALWAYS carry a small zippered case with the following: hand cream, saline, extra pair of contacts, sanitizer wipes, kleenex, chapstick, nail file, pen, advil/tylenol, mints and an Arbonne fizzy pack (click here to get your fizzies).  So, in my mini backpack, I have the small zippered case, my wallet and sunglasses.  This backpack is small and will easily fit inside my larger backpack.

    mini backpack


    My larger backpack is a regular sized backpack with a main compartment and front zippered compartment.  In here are our boarding passes and flight itinerary, my ipad (not pictured since I was taking pics with it), my kids’ itouch and ipad, their blankies, a bag of snacks, all our electronics cords, my TSA liquids bag and my mini backpack.

    travel packpack


    Here is my last set of tips to ease some stress while you are traveling with kids.  I have found four great accessories that I can’t live without.  The are all less than $20 each and worth every penny.  My Cocoon Grid It, it is pictured above and keeps all of my cords and chargers organized.  The other three are pictured below and I got them at Five Below or through online daily deals (Living Social, Eversave, Groupon).  They are a head phone jack splitter (in pink) so that kids can watch the same thing on one device and each use their own headphones.  My three way charger that has the new small I jack, the old larger I jack and an android jack.  Last but certainly not least, my Pebble Smartstick.  This is an emergency charger that can bring your phone back to full power or keep an ipad from dying while in use.  Perfect for on a plane if someone’s device runs out of juice.

    favorite electronic accessories


    Now we are ready to go!  Just make sure everyone goes to the bathroom before you get in the car.  Happy Travels!

    If you liked today’s post, you’re welcome to use it in your own newsletter or blog as long as you include the following blurb: Certified Professional Organizer, Certified Organizer Coach and Life Management Expert, Tara Donohue Rudo, helps working moms and families focus on what is important. Get her FREE weekly tips and advice at www.NoMorePiles.com.

  • Organize Your Fitness: We LOVE Fitbit!

    At No More Piles we are Fitbit fanatics. Tara and I wear our Fitbits every day. Don’t know what a Fitbit is? Well, some will say it’s just a pedometer, but really, it is so much more.

    It tracks:
    • How many steps you take
    • How many miles you’ve walked
    • How many flights of stairs you have climbed
    • How many calories you have burned
    • How many active minutes you have had in your day
    • GPS your walk, jog or run
    • The Force, Flex and One can even monitor your sleep.

    I have the Force and Tara has the One and we are working on getting them for the rest of our No More Piles team.  But, as organizers, we are analyzing the pros and cons of each model to figure out which is best for each of our lifestyles.  I prefer the Force, but it is currently retired.  Tara has the One and loves it because you can clip it anywhere: shoe strings, bra strap, belt loop, etc.  The only drawback to the One is that you have to remember to move the clip when you change clothes.

    fitbit

    Fitbit also provides you with a free app and website to keep track of your vital information. It syncs via Bluetooth to your device, so you don’t have to do a thing once you initially pair it with your device. You can also log your daily food intake to get an accurate account of the calories you take in and those you burn off (although we prefer to log food with MyFitnessPal app which integrates with the Fitbit app). View all of your information on your smartphone or directly on the FitBit website from your desktop.

    You are able to customize goals. You can set how many steps you want to take per day. You can also set your active minute, ounces of water consumed and weight loss goals. When you reach your daily goal your Fitbit buzzes to let you know or if you are looking at the app or website it send off happy little smiley faces for reaching those targets. It only needs to charge once a week (Tara charges hers in the car on the way to clients) and once it is recharged it always has something nice to say to me. This morning it was “Cheers”.

    Our favorite feature is the ability to compete with your friends. Link up with others who have Fitbits and you are able to see who has the most steps. You can cheer, taunt or message any of your Fitbit friends to up the competition or encourage them to reach their goals.  If you are striving to stay active this is a great product to help keep you motivated. It’s always a big competition between Tara and I to see who is getting the most steps. And if I’m honest sometimes knowing Tara is only a few steps ahead of me, is all the motivation I need to go for a walk in the evening to edge her out!

    Check out the Fitbit we love it!!

    If you liked today’s post, you’re welcome to use it in your own newsletter or blog as long as you include the following blurb: No More Piles Project Manager, Joan Robinson, helps working moms and families focus on what is important. Get our FREE weekly tips and advice at www.NoMorePiles.com.


  • Tara Donohue Rudo Earns Certified Organizer Coach® Designation

    Tara Donohue Rudo Earns Certified Organizer Coach® Designation

    Media Contact:
    Kelly Beninghove

    410-861-2095
    Owings Mills, MD  21117
    [email protected]
    www.NoMorePiles.com
    FOR IMMEDIATE RELEASE

    BALTIMORE, MD – June 9, 2014 – No More Piles congratulates Tara Donohue Rudo, Owner, for receiving the designation of Certified Organizer Coach.  Rudo is now the only person in Maryland to have achieved both the Certified Professional Organizer® and Certified Organizer Coach® designations.

    Coach Approach for Organizers™ was created in 2006 by Denslow Brown in collaboration with ADD coach and CTI graduate Cameron Gott. The International Coaching Federation granted Coach Approach full accreditation status in 2014.

    The COC designation requires a minimum of two years of classes and training, over 100 hours of paid client coaching work, mentoring hours, and a rigorous written application process which included a graded recorded coaching call and live coaching evaluation.

    Rudo said, “I am honored to have earned the COC designation.  To be part of such an elite group of coaches is humbling.  I look forward to working with many clients in helping them achieve their goals through accountability coaching.  Most of us struggle to find true accountability partners to keep us focused, but the 95% success rate achieved by those with accountability partners speaks for itself.”

    About No More Piles
    No More Piles is a privately held, woman-owned company providing organizing, coaching and public speaking. Founded in 2002 by Tara Donohue Rudo, No More Piles is located in Owings Mills, MD  For more information, visit www.NoMorePiles.com or call 410-861-2095.


  • Mediterranean Crockpot Turkey

    Every other day I hear from friends and clients that they struggle with finding new recipes that their family will eat and are easy enough to get them on the table with minimal fuss.  So, we are going to add blog posts each month with staff tested recipes and our families have eaten and enjoyed and are easy to get on the table.  This week’s recipe is Mediterranean Crockpot Turkey.

    Ingredients:
    1 (4 pound+) turkey breast (bone in or boneless)
    Ingredients, Before and After
    Mediterranean Crockpot Turkey
    3 cups chopped onion (about 2 medium)
    1/2 cup pitted kalamata olives
    1/2 cup julienne-cut drained oil-packed sun-dried tomatoes
    2 tablespoons fresh lemon juice
    1 1/2 teaspoons minced garlic (or 2 dorot frozen garlic cubes)
    1 teaspoon salt
    1/2 teaspoon pepper
    1/2 cup chicken broth
    1/2 teaspoon thyme
    1/2 teaspoon oregano
     
    Combine all ingredients in crockpot and cook on low for 7 hours.  When done, turkey can be plated by shredding into smaller pieces and topped with the jus and onion mixture from cockpot.  For pickier eaters, serve the onion mixture and jus on the side.  Baked potatoes, mashed potatoes or rice and green beansmake great side dishes.

    If you like this recipe, you are welcome to use it in your own newsletter or blog as long as you include the following blurb: Certified Professional Organizer and Life Management Expert, Tara Donohue Rudo, helps working moms and families focus on what is important. Get our FREE weekly tips and advice at www.NoMorePiles.com.

  • New Year’s Resolutions-Week 2

    We have completed week two of our New Year’s Resolutions 6 week accountability program and we had a much more successful week.  Yay!!  There were three big lessons that came out of this week that we want to share with you:

    1. PLAN to succeed.  Planning our weeks with time blocks for our resolution activities helped keep us on track.  For me with my flossing, I have now put floss everywhere!  I have it in my bathroom, kitchen, car and purse.  By surrounding myself with the necessary supplies, I don’t have to worry about forgetting to grab what I need.

    2. Give yourself a BUFFER.  If you are trying to get 5 hours in a week and you know that it is a crazy week with lots of balls in the air, plan for 6 hours and you are much more likely to get the 5 done.

    3. Get it done FIRST thing in the morning.  If we scheduled the task for right when we woke up, we were much more likely to get it done.  By checking the box first thing in the morning, we also felt great for the rest of the day knowing that we were one step closer to our weekly goals.

    So, here is the team update for this week:

    Tara – Flossed three days this week.  Now that I have floss in every nook and cranny of my house and car, I am expecting to hit a five for the coming week.

    Joan – Great improvement!  Was only 15 minutes shy of her 5 hour target.

    Krista – Got all 3 workout sessions in!  Great week for Krista!

    Terri – Lost 1.8 pounds last week.  Huge week for Terri!

    I am so proud of the work the team is putting and of their willingness to put their learning out here for all to see.  Remember, the biggest part of accountability is the learning.  Learning what worked and what didn’t and making changes to keep working toward your goals.


  • New Year’s Resolutions 2014

    It is January 2014 and that means it is new year’s resolution time!  Many of us choose resolutions, but only 8% of people are successful in achieving their resolution.  So, this year we want to set you up for success.  The first key to success is setting a SMART goal.  A SMART goal is one that is: Specific, Measurable, Achievable, Relevant & Time-bound.  The second key to success is accountability!  Adding accountability will improve your chances of success from 8% to around 95%. Here are the hard truths:

    Here are your chances of success if:

    You hear an idea  – 10% chance

    If you consciously decide to do something – 25% chance

    If you schedule tasks for the project – 40% chance

    If you commit to someone else to complete the project – 65% chance

    If you set accountability appointments with a committed person – 95% chance

    So, if you are serious about making real change in your life this year, you are going to need help.  Enlist a friend or family member to be your accountability partner and commit to reporting to each other at a specific date and time.  You can also add a consequence for failing to meet your goal:  babysit their kids for a night, pay for their dinner or make a donation to their favorite charity.  If you don’t have someone that fits this bill, hire someone.  Depending on your goal, hiring a coach, personal trainer or nutritionist can not only give you an expert’s advice, but add the necessary accountability to help you reach your goals.

    As organizers, we are often put on an accountability pedestal.  Many assume that since we are organized that we can easily achieve our goals.  I am here to tell you that we have to work just as hard to create new habits or break old ones as anyone else.  So, scroll down to see our team’s goals for the next six weeks.  We plan to post a new blog entry each week to report in to you on how we are doing.  We will also be posting on our facebook and linkedin pages, so you can check those out too.

    Tara – Floss my teeth 5 times per week
    Joan – Exercise 5 hours per week
    Kelly – Exercise for 30 minutes per day up until delivery, then it will change to find one new “clean” recipe a day to implement into our weekly meals.  (Kelly has a baby due in 3 weeks)
    Terri – one pound a week for six weeks.
    Krista – exercise at least 30 minutes 3x week
    Tracey – Lose 1/2 pound per week
     

    If you have made a decision to create/stop a habit, set a SMART goal and have an accountability partner, then you are well on your way to success.  Feel free to go to our facebook or linkedin pages and leave your goals there for added accountability.  Good luck!

    If you liked our post, you’re welcome to use it in your own newsletter or blog as long as you include the following blurb: Certified Professional Organizer and Life Management Expert, Tara Donohue Rudo, helps working moms and families focus on what is important. Get our FREE weekly tips and advice at www.NoMorePiles.com.